How to print photos with an iPad 3 (there’s just one hitch…)
Many users love their iPad 3 for its high-resolution Retina display. With a diameter of only 9.7″ and 2,048 x 1,536 pixels it has a higher resolution than most 24″ displays used with desktop computers. Therefore the human eye is almost unable to make out single pixels.
These days we are quite a bit into experimenting with Harman’s direct positive paper. Which is why we wanted to find out whether it is possible to print photos (on real photo paper!) directly from the iPad’s high-resolution display without using additional accessories.
Preparations
The single most important tool for printing photos with the iPad 3 is the pre-installed “Photos” app. With its help you can start a slide show in order to control the exposure. For this purpose you have to create several entirely black images with the exact resolution of the iPad’s display (2048 x 1536 pixels). Two of these are fitted with a grey outline around a centred 1,393 x 1,143 pixel rectangle, which is the size of the image that you want to print. Your photo should be of the same size, with a black frame to fit the screen. In fact it is a little bit larger than the 4×5″ HARMAN Direct Positive Paper (UK) now, but this makes it a lot easier to place the paper on your iPad. Set the slide show to a sequence of something like: frame – black – frame – black – photo – black – black. Unfortunately it is not possible to put the images into an individual order; the app always arranges them by date and time. So you have to create your files systematically or change the time code afterwards. Probably there is also a free app available that allows you to arrange the photos as you like, but we could not find it.

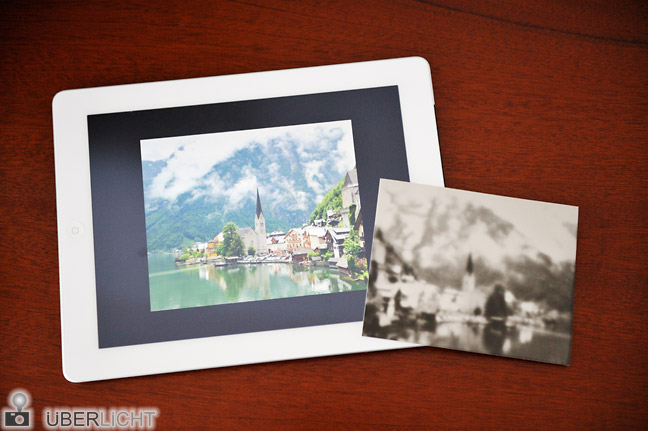
Photo ready for printing with an iPad3 on HARMAN Direct Positive Paper – © Überlicht
Into the dark room
First you have to set the display brightness to the lowest possible level, then set the slide time to 2 seconds and clean the glass thoroughly. After all, you do not want to have your finger prints imprinted, do you? For placing the photo paper onto the iPad it is very helpful to put on cotton gloves. Otherwise the slightest contact with the touch screen interrupts the slide show. After turning off the light in your dark room, lay the iPad on a plain surface and start the slide show. Place a sheet of direct positive paper within the frame and weigh it down with a book or something similar, so that it does not curl. After exposure turn off the iPad display immediately, take off the book and paper and develop the latter in Caffenol. Obviously any other paper developer can be used as well.

iPad3 with “printed” photo on HARMAN DPP – © Überlicht
In the end there is…
…disappointment. Every photographer knows that a “contact copy” of this kind inevitably has to produce a reversed image. But we did not expect the image to be completely blurred. What happened?
A common deficit of spontaneous inspirations is that you do not thoroughly think through your idea’s details. The iPad display is covered by a thin but still thick enough protection glass. Therefore the light scatters and is diffused when it hits the paper. The result resembles a strong soft focus effect and leaves a picturesque impression.
With this outcome we unfortunately had to give up on our idea – as much as we loved it! Without optical accessories, printing images from an iPad 3 does not really work. Well – at least we tried.
The original German post has been published on Überlicht.de September 11th 2012.


Try this:
Set up a large format camera + tripod in a darkroom
Point the camera directly down
Take the back of the camera
Place the ipad on the back face down
Focus the image on the ground
Expose a sheet of photo paper
Hello Paul,
this would surely work (and be something similar to the Impossible instant lab). But has every iPad owner got a large format camera as well?
Hi guys, I tried this method before I started developing my digital enlarger, your right, this will never work as a contact print with an iOS device, but will work fine with a traditional LCD display as it has no front glass, the resulting print is known as a Laptopogram.
@Paul – I’m way ahead of you with the camera as an enlarger, I’ve tested the theory with a medium format and have a large format plate camera on its way from ebay now.
Have a look at my work so far : adamrhoades.com/digital-darkroom.html
Hi Adam,
thanks a lot for your feedback. We followed your recent work with much interest. Obviously you did it just right!
I am looking forward to seeing the results of your new work with the large format camera.
Andreas
I actually have a cold-light back for my Speed Graphics that lets you use the SG as a large-format enlarger. I’ll definitely try it with the iPad3.
Just ran across this after I finished my project at http://remorseblog.blogspot.co.uk/
I thought about the contact print too but thought it suffer from the problems you saw. Good times.
I made some shots with a homemade pinhole pointing to an iPad. It works perfectly. It takes a little care to get a perfect framing. The film I used has a hideous reciprocity, but I’m patient. Here are two examples; https://www.flickr.com/photos/126902035@N08/21748209326/in/album-72157646496369791/
https://www.flickr.com/photos/126902035@N08/21588000886/in/album-72157646496369791/
Hi all,
Would method work with a beamer? Projecting the picture onto the paper?
I was thinking about reversing the picture. Then project it with a LED projector on the possitive paper. Does anyone have experience with this?
Greetings
Stefaan
Actually people do this kind of printing with analogue enlargers in classic darkrooms for really big prints: https://petapixel.com/2015/09/04/this-is-how-you-make-a-massive-4×5-foot-print-in-the-darkroom/
So yes, this could work, if you can focus the beamer as close as you need it.